Mastering The Blowout Taper With Curly Hair - Your Guide
Getting that sleek, stretched look for your beautiful curls can feel like a bit of a dream, especially when you're aiming for a specific shape, like a taper. It's about coaxing your natural texture into something a little different, something with a smooth flow that still shows off your hair's personality, you know? Many folks with coils and waves think a blowout taper is just too much fuss, or maybe even impossible, but that's really not the case at all.
We're going to talk about how to get that polished, longer look without losing the heart of your curls, giving them a lovely, gradual shape that looks really intentional. It’s a way to change up your style, perhaps for a special event or just because you feel like something new, and it can actually protect your hair from daily styling, which is kind of cool. This approach lets your hair breathe a little, allowing it to move freely while still looking neat and put together.
So, if you've ever looked at pictures of a perfect blowout taper and thought, "Could my curly hair do that?" the answer is a pretty clear yes. It just takes a few good steps and a little patience, and you'll be well on your way to rocking a look that’s both soft and striking. We’ll go through all the bits and pieces you need to know, from getting your hair ready to finishing it off with a nice touch, too it's almost like giving your curls a little vacation from their usual routine.
- Sting Children
- Paloma Jim%C3%A9nez Movies
- Skarsgard Stellan
- Alyssa Diaz Movies And Tv Shows
- Melody Perkins
Table of Contents
- How Do You Get Curly Hair Ready for a Blowout Taper?
- What Tools Work Best for Mastering the Blowout Taper with Curly Hair?
- The Gentle Art of Stretching Your Curls for a Blowout Taper
- Shaping the Sides - Getting the Taper Just Right for Mastering the Blowout Taper with Curly Hair
- Protecting Your Hair During the Blowout Taper Process
- How Do You Keep Your Blowout Taper Looking Great on Curly Hair?
- Common Little Hiccups When Mastering the Blowout Taper with Curly Hair
- Styling Your Finished Blowout Taper with Curly Hair
How Do You Get Curly Hair Ready for a Blowout Taper?
Getting your curly hair ready for a blowout taper is, you know, the first really important step. You want your hair to be clean, but also really soft and easy to work with. Think about it like preparing a canvas before you paint; you want it smooth and ready for whatever comes next. This usually means starting with a good wash, using something that cleanses without stripping away all the natural oils your curls love so much. A gentle shampoo that doesn't leave your hair feeling squeaky clean is often a good pick.
After shampoo, a generous amount of a rich, creamy hair conditioner is pretty essential. This isn't the time to skimp, actually. You want to coat every single strand, making sure it feels slippery and well-nourished. Let that creamy stuff sit for a bit, giving your hair a chance to drink it all in. This step helps loosen up your curl pattern, which makes it a lot easier to stretch later on without causing any trouble for your hair. You want your fingers to glide through your hair with very little resistance, basically.
Once you've rinsed out that lovely conditioner, it’s time to gently work out any little tangles. A wide-tooth comb or even just your fingers can do the trick here. Start from the ends of your hair and slowly, carefully, make your way up towards your scalp. This gentle detangling, in a way, sets the stage for a smoother experience when you bring out the heat tools. Remember, your curly hair is pretty delicate when wet, so being kind and patient is the key here. You don't want to pull or yank at all, just let the comb or your fingers ease through.
- Lewis Pullman Height In Feet
- Allintitleyour Honor Showtime Cast
- Chris O Donnell
- September 16 Zodiac
- Carlos Pr%C3%ADo Odio
Finally, before any heat comes near your hair, you'll want to put on a good amount of something to shield your strands from the warmth. This protective layer is really, really important for curly hair, as it helps keep it from getting too dry or damaged. Spread it evenly from your roots all the way to your ends. Some people like a spray, others prefer a cream or a serum, but the main thing is that it creates a barrier. This prep work, you know, really makes a big difference in how your blowout taper turns out and how your hair feels afterwards.
What Tools Work Best for Mastering the Blowout Taper with Curly Hair?
Picking out the right tools for your blowout taper with curly hair is, honestly, half the battle. You can't just grab any old hair dryer and expect magic to happen. The right equipment makes the whole process much smoother and helps you get that lovely, stretched shape you're aiming for. First off, a good hair dryer is pretty much non-negotiable. Look for one that has different heat settings, so you can control the warmth, and also different speed settings. A cooler shot button is also a nice bonus, as it helps to set the style once your hair is dry.
Next up, you'll definitely want a concentrator nozzle for your dryer. This little attachment is what helps direct the air flow exactly where you want it to go, making it easier to smooth each section of hair. Without it, the air just blows everywhere, which can make your hair frizz up and make it really hard to get that sleek finish for your blowout taper. It's kind of like trying to paint a straight line without a brush, you know? The nozzle helps you be precise.
When it comes to brushes, you've got a couple of good options. A paddle brush is fantastic for getting a lot of hair stretched out at once. Its flat, wide surface can cover more ground, and the bristles are usually gentle enough not to pull too hard on your curls. For more control, especially around the areas where you want that gradual shortening look, a round brush can be really helpful. Different sizes of round brushes give different amounts of curl or straightness, so you might even want a couple of them. A smaller one is often good for the shorter parts of the taper, actually.
And then there are clips. You'll need a bunch of them, basically. These are for dividing your hair into smaller pieces, which makes the whole process much more manageable. Trying to blow out all your curly hair at once is pretty much impossible and will just leave you feeling frustrated. So, sectioning clips, sometimes called duckbill clips, are your friends here. They hold the hair out of the way while you work on one small part at a time, allowing you to really focus on getting that smooth, stretched look for your blowout taper with curly hair. It's a simple tool, but really quite effective.
The Gentle Art of Stretching Your Curls for a Blowout Taper
Stretching your curls for a blowout taper is a delicate process, something that requires a light touch and a bit of patience. You’re not trying to yank your hair straight, but rather to gently lengthen your natural curl pattern. This is where the combination of your hair dryer and your brush really comes into play. You want to work with small parts of your hair at a time, no bigger than maybe an inch or so in width. This helps ensure that each strand gets enough attention and heat to stretch properly.
Hold the hair dryer with the concentrator nozzle pointing down the hair shaft, following the direction your brush is moving. The air flow should always be going downwards, from your roots to your ends. This helps to smooth the hair cuticle, which is what gives you that shiny, less frizzy look. If you blow air upwards or against the grain of your hair, you're pretty much asking for frizz, and that’s not what we want for a nice, smooth blowout taper with curly hair. So, aim the air carefully, you know?
As you pass the brush through each section, keep it moving steadily. Don't let the heat sit in one spot for too long, as that can cause too much warmth and potentially damage your hair. The idea is to gently pull the hair taut with your brush while the warm air from the dryer follows right behind it, stretching the curl as it dries. This takes a little coordination, but you’ll get the hang of it with some practice, actually. It’s a bit like a dance between your hands and the tools.
For the best results, make sure each part of your hair is completely dry before you move on. If you leave any dampness, your curls might revert, and that means your stretched look won't last as long. You want that hair to feel soft and dry, almost like silk. This gentle stretching is what gives your curly hair that lengthened appearance while still keeping some body and bounce, which is kind of the whole point of a blowout taper, after all. It’s about coaxing, not forcing, your natural texture into a new shape.
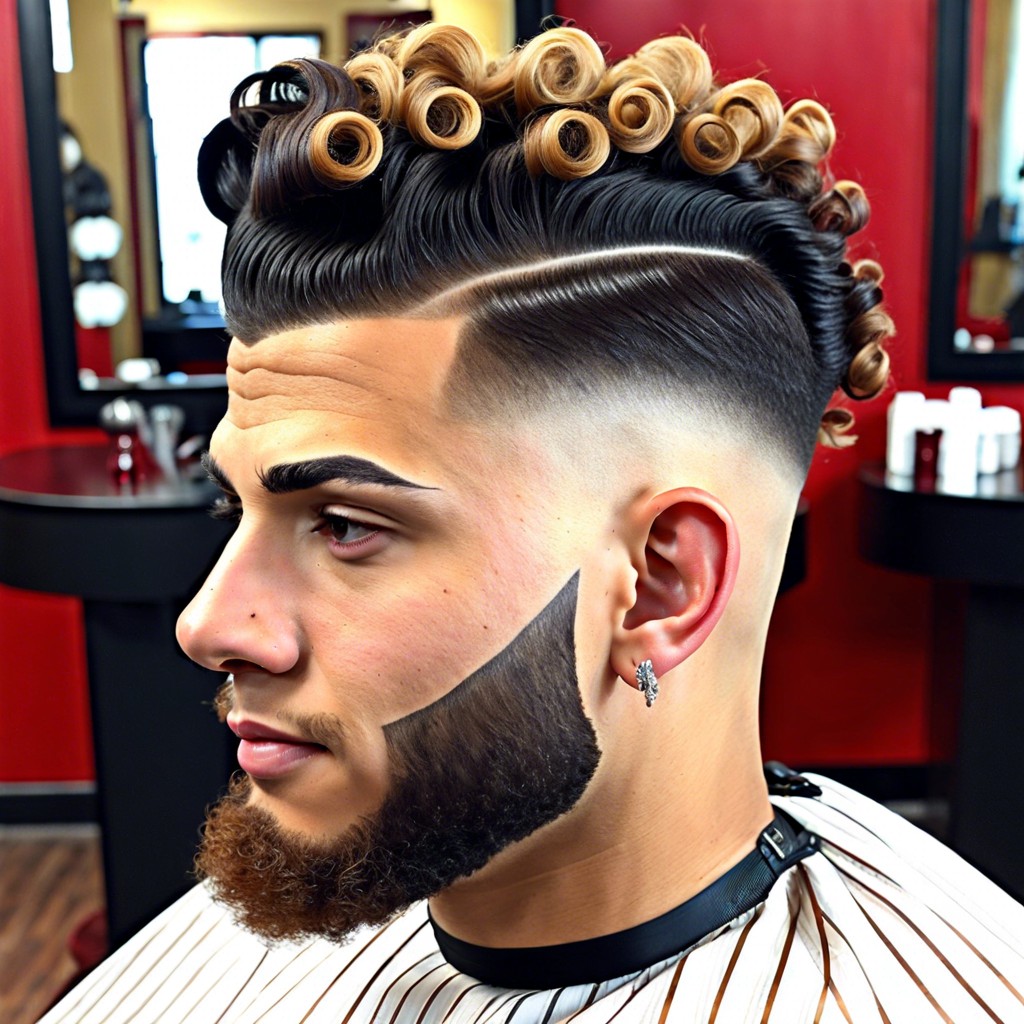
Shaping the Sides - Getting the Taper Just Right for Mastering the Blowout Taper with Curly Hair
Getting the taper part of your blowout taper just right, especially on the sides, is what gives this look its distinct shape. This means gradually shortening the hair as it gets closer to your ears and neck. It’s a bit like sculpting, really, where you’re creating a smooth transition from longer hair on top to shorter hair at the bottom. This step is where a smaller round brush or even a fine-tooth comb can come in handy, because you need to be quite precise, basically.
Start by identifying where you want the shortest part of your taper to begin. This is usually around your hairline at the sides and back. Work with very small parts of hair in these areas. You’ll use your dryer and brush, just like before, but with a bit more focus on the length you're creating. For a tighter taper, you might even use just the concentrator nozzle and your fingers to guide the hair downwards and smooth it out against your head. This helps to really flatten those shorter bits, you know?
As you move upwards from the shortest parts, you'll gradually increase the length of the hair you're stretching. This creates that smooth, sloped effect. You want to avoid any harsh lines or sudden changes in length. The aim is for a soft, natural progression. It might take a few passes over each section to get it just right, making sure the hair lays flat and straight in these areas. This attention to detail is what makes a blowout taper truly stand out on curly hair, as it really defines the shape.
Once you’ve got the general shape in place, step back and take a look from different angles. Are there any spots that look a bit bulky or uneven? This is your chance to go back in with your dryer and brush, or even just your fingers, and refine those areas. Sometimes, a little cool air can help set those shorter parts even flatter against your head. Getting the taper just right is arguably the most artistic part of the whole process, giving your blowout taper with curly hair that really polished, finished look.
Protecting Your Hair During the Blowout Taper Process
Protecting your hair during the blowout taper process is, you know, absolutely essential, especially when you have curly hair. Your curls are naturally a bit more prone to dryness and can be sensitive to warmth. So, making sure you shield them from potential harm is a big deal. The very first line of defense is always that good heat protectant we talked about earlier. Think of it as a little invisible shield for your strands, something that helps spread out the warmth and keep it from focusing too intensely on one spot.
Beyond the products, how you use your tools also plays a huge part in keeping your hair safe. Always keep your hair dryer moving. Never, ever let it sit in one place for more than a second or two. Constant movement helps prevent hot spots that can really dry out or even burn your hair. This is why working in small parts of hair is so important; it allows you to move quickly and efficiently through each section without dwelling too long on any one area. It's a bit like cooking, you know, you keep stirring so nothing burns.
Another thing to consider is the heat setting on your dryer. While you need warmth to stretch your curls, you don't necessarily need the highest setting. Start with a medium heat and see how your hair responds. If it's stretching nicely, then that's probably enough. Only go for a higher setting if you absolutely need to, and even then, make sure you're moving the dryer very, very quickly. It's always better to use less warmth and take a little more time than to blast your hair with too much heat and cause damage, basically.
Finally, listen to your hair. If you notice a burning smell, or if your hair feels overly hot to the touch, stop immediately. Let it cool down before you continue. Sometimes, taking a short break can help. And after you're done with your blowout taper, consider using a light hair oil or serum to put some moisture back into your strands. This helps seal the cuticles and gives your hair a healthy shine. Protecting your hair means you can enjoy your blowout taper with curly hair without worrying about long-term consequences, which is pretty nice.
How Do You Keep Your Blowout Taper Looking Great on Curly Hair?
Keeping your blowout taper looking good on curly hair, once you’ve gone through all that effort, is definitely something you want to think about. It's not a style that typically lasts as long as your natural curls might, but with a few simple tricks, you can stretch its lifespan. The biggest enemy of a blowout taper is moisture in the air. Humidity can make your stretched hair revert to its curly state pretty quickly, so that's something to be really mindful of, you know?
One of the best ways to keep your style fresh is to protect it while you sleep. Wrapping your hair in a satin or silk scarf, or sleeping on a satin or silk pillowcase, can make a huge difference. These materials are much gentler on your hair than cotton, which can rough up the hair cuticle and cause frizz. Wrapping your hair loosely, perhaps in a pineapple shape on top of your head, helps keep the stretched parts from getting squashed or bent out of shape overnight. It’s a simple habit, but honestly, it helps a lot.
When you shower, it's a good idea to cover your hair completely. A good quality shower cap that really seals around your hairline is your friend here. Even the steam from a hot shower can start to make your hair revert, so keeping it completely dry is key. Some people even put a second scarf or a plastic bag over their hair before the shower cap for extra protection, which might sound like a lot, but it really works to keep that blowout taper with curly hair looking good.
For touch-ups, if you notice a little bit of frizz or some areas starting to curl up, you can use a very small amount of a light hair serum or oil to smooth them down. Sometimes, a quick pass with a hair dryer on a cool setting, just to smooth out a specific section, can also help. Try to avoid adding too much product, though, as that can weigh your hair down and make it look greasy. It's about light touches to refresh, not to completely restyle, basically. With a little care, your blowout taper can look great for a few days.
Common Little Hiccups When Mastering the Blowout Taper with Curly Hair
Even with the best intentions, you might run into a few little hiccups when you're trying to get that perfect blowout taper with curly hair. It's totally normal, and honestly, everyone experiences them at some point. One common issue is frizz. You've gone through all the steps, and yet, your hair still looks a bit fuzzy. This could be because you didn't use enough heat protectant, or maybe the air flow from your dryer wasn't consistently pointed downwards. Sometimes, it's just the humidity in the room, so using a little anti-frizz serum after you're done can help, you know?
Another thing that can happen is your hair might not get as straight or as stretched as you wanted. This often means you're not working with small enough parts of hair, or you're not getting each section completely dry. Remember, leaving even a tiny bit of dampness can cause your curls to spring back. It could also mean your heat setting isn't quite warm enough for your specific curl type, so you might need to try a slightly higher temperature, but always with caution and constant movement of the dryer, of course.
Sometimes, the taper itself might not look as smooth or as gradual as you hoped. You might see a bit of a line where the longer hair meets the shorter hair. This usually means you need to blend those sections more carefully. Go back in with your smaller brush or comb and gently work those transition areas, making sure the hair flows seamlessly from one length to the next. It takes a bit of an eye for detail, but you’ll get better at it with practice, basically.
Lastly, some people find their hair feels a bit dry or brittle after a blowout. This is a sign that you might be using too much heat, or not enough protective product. Always, always prioritize the health of your hair. If you notice this, consider reducing the heat setting, adding more heat protectant, or even doing a deep conditioning treatment before your next blowout taper. Your curly hair is beautiful, and keeping it healthy means you can keep rocking these styles without worry, which is pretty important.
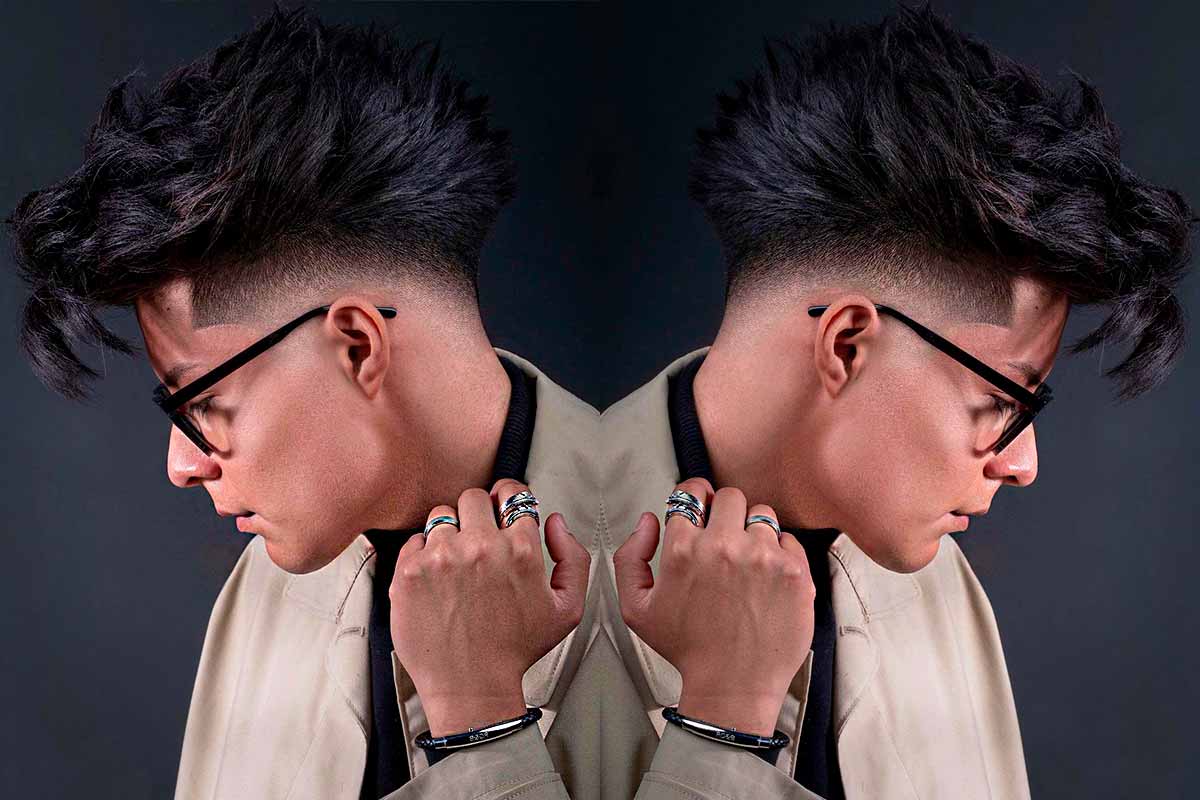
Styling Your Finished Blowout Taper with Curly Hair
Once you’ve got your blowout taper looking just right, the fun part begins: styling it! This is where you can really show off the shape and make it your own. Because your hair is stretched and has that lovely, gradual shortening look, it opens up a whole bunch of styling possibilities. You can wear it down, letting the smooth texture and defined taper speak for themselves, which is a classic and very elegant way to show off your blowout taper with curly hair.
For a more polished look, you could add a side part or a middle part, letting the hair fall naturally. A little
15 Blowout Taper Fade Curly Hair Ideas for a Fresh Look – Burst of Style

Effortless Style: Blowout Taper With Curly Hair For A Polished Look
Best 19 Blowout Taper - Taper Haircuts
